Many people are complaining about I2C communications problems, mostly related with the NodeMCU LUA.
I found out that many of the related problems are generated from a easy to fall in trap, generated by the way how code is executed in case of a step-by-step debug run or using a interpreter console, as in our above NodeMCU LUA case.
Let’s take a very simple example code and with the help of a Oscilloscope let’s see what’s happening exactly. I have choosen a LM75 I2C temperature sensor for our example, as been widely used and also people heavily complained about communication problems with. For more details about the code take a look at the LM75 Temperature sensor Article.
address = 0x48  -- LM75 I2C Address
temp_reg = 0     -- temp reg
 bus = 0              -- I2C bus
 sda, scl = 2, 1   -- Used pins for SDA and SCL

 -- init I2C Bus
   i2c.setup(bus, sda, scl, i2c.SLOW)

 -- LM 75 Communication
   i2c.start(bus)
  i2c.address(bus, address, i2c.TRANSMITTER)
  i2c.write(bus, temp_reg)
  i2c.stop(bus)

  i2c.start(bus)
  i2c.address(bus, address, i2c.RECEIVER)
  c=i2c.read(bus, 2)
  i2c.stop(bus)

  h,l = string.byte(c,1,2)
  if h > 127 then h = h - 255 end
  if l > 127 then l = 5 else l = 0 end
  temp=string.format("%d.%d", h,l)
  print(temp)
If you take the code from above, save it on ESP8266 module as lm75_test.lua and run it after that as
dofile(“lm75_test.lua”) you will see that the result is OK, typing the right temperature, 29C in our case.
 |
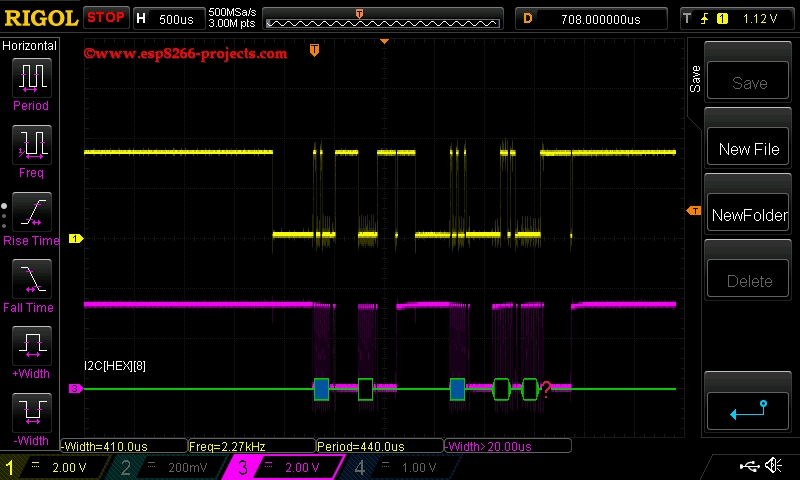
| LM75 – I2C Communication – 500 us timebase |
If we zoom in a bit, we will be able to identify also our code snippets:
  i2c.start(bus)
  i2c.address(bus, address, i2c.TRANSMITTER)
  i2c.write(bus, temp_reg)
  i2c.stop(bus)
-> temp_reg = 0x00
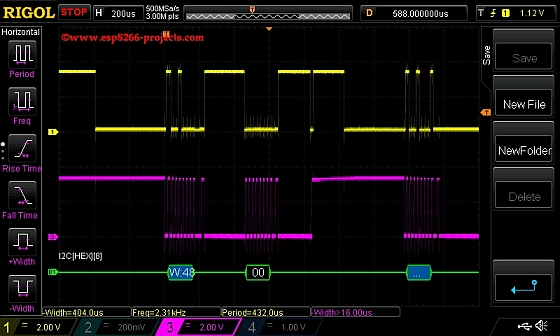 |
| LM75 – I2C Communication – zoom in – 1 |
  i2c.start(bus)
  i2c.address(bus, address, i2c.RECEIVER)
  c=i2c.read(bus, 2)
  i2c.stop(bus)
   h,l = string.byte(c,1,2)
– > l = 0 (0x00)
 |
| LM75 – I2C Communication – zoom in – 2 |
So, as you can see above, all OK and confirmed also by decoding the I2C communication on the Oscilloscope.
Now, let’s see what’s happening when running the same code from the console (just select the code and press “Execute Selection” button.
-> h = 255
-> l = 255
-> temp = 0.5
WHAT?! WHY?!
Let’s take a look on the Osciloscope also for this Run, using the same timebase, 500us :
 |
| LM 75 – I2C Communication – Run from console – 500us |
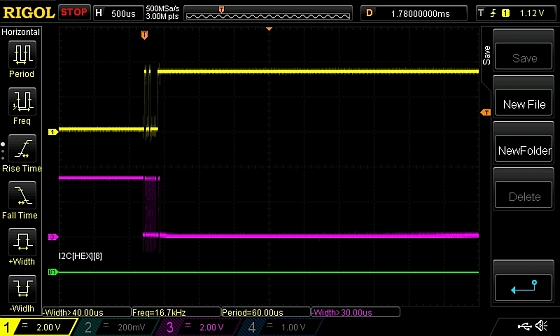
Confused? Let’s increase the time base to 500ms and let’s see what we can found about:
 |
| LM 75 – I2C Communication – Run from console – 500ms |
What is telling us the last picture? The TIMING now is totally wrong !!
Why?
Because of the way that the code is sended to the interpreter and the way that is run, line by line!!
And please remember , these nasty things might happen in some conditions, even in case of a compiled code, not interpreted, when the code is in a step-by-step debugger mode run!
Might look silly and trivial, but imagine a way more complex code, all working OK, adding some extra modules, start debugging for them and suddenly starting having problems with previous tested modules, some nice working ones!
If you fall in such a trap, you can end up to spin around in circles for weeks.
What can be the solution? Easy. Just use the Rule number one: keep sensitive things like communication/timing and stuff at “atomic” level! Reading carefully the Datasheets can help you to quickly identify the “atomic granulation”.
How can be done that in a easy way? Simple. Just use a FUNCTION!
Rememer, using functions in you code will give you not only the advantage of high readability, a modular and structural programming, easy debugging, etc, but also, if functions are designed properly, can help you to avoid a potential pitfall as the one above.
Corrected code:
address = 0x48  -- LM75 I2C Address
temp_reg = 0     -- temp reg
 bus = 0              -- I2C bus
 sda, scl = 2, 1   -- Used pins for SDA and SCL

 -- init I2C Bus
   i2c.setup(bus, sda, scl, i2c.SLOW)

 -- LM 75 Communication
 function read_temp()
   i2c.start(bus)
  i2c.address(bus, address, i2c.TRANSMITTER)
  i2c.write(bus, temp_reg)
  i2c.stop(bus)

  i2c.start(bus)
  i2c.address(bus, address, i2c.RECEIVER)
  c=i2c.read(bus, 2)
  i2c.stop(bus)

  h,l = string.byte(c,1,2)
  if h > 127 then h = h - 255 end
  if l > 127 then l = 5 else l = 0 end
  temp=string.format("%d.%d", h,l)
  print(temp)
end

 read_temp()
And Yes, you can refine it even better than that 🙂
function init_I2C(sda, scl)
     i2c.setup(bus, sda, scl, i2c.SLOW)
 end

 function read_temp()
   i2c.start(bus)
  i2c.address(bus, address, i2c.TRANSMITTER)
  i2c.write(bus, temp_reg)
  i2c.stop(bus)

  i2c.start(bus)
  i2c.address(bus, address, i2c.RECEIVER)
  c=i2c.read(bus, 2)
  i2c.stop(bus)
end

 function print_temp(c)
   h,l = string.byte(c,1,2)
  if h > 127 then h = h - 255 end
  if l > 127 then l = 5 else l = 0 end
  temp=string.format("%d.%d", h,l)
  print(temp)
 end
 -->>
 init_I2C(sda, scl)
 read_temp()
  print_temp(c)
  29.0