One of the desired and also needed things in many projects is the availability of a local display to be able to directly see messages, values, results, etc. What we will need to be able to easy interface it with ESP8266 module is a 3V logic level compatible one and if it has genuine I2C interface even better for us as less data lines will be used and will keep our CBDB Dev Board I2C bus consistent.
A most common type of available I2C displays are the ones based on ST7032/i chip. You can find them in many flavours, from very cheap eBay ones to very expensive industrial/mil grade ones. The one used in this project it’s a good quality, high contrast/direct sunlight midrange one. Cannot say exactly the price as it’s old stock and was ordered a time ago in big quantities, but somewhere around 8-9$. If is showing interest I can ask supplier for an updated price.
 |
| ST7032i I2C 2×16 COG LCD Display |
ST7032i is the I2C interface variant of the ST7032 dot-matrix liquid crystal display controller, can display alphanumeric, Japanese kana characters and symbols and it can be configured to drive a dot-matrix liquid crystal display under the control of a 4-bit, 8-bit or 3/4-line serial interface
microprocessor.
FEATURES :
• 5 x 8 dot matrix possible
• Low power operation support: 2.7 to 5.5V
• Range of LCD driver power: 3.0 to 7.0V
• 4-bit, 8-bit, serial MPU or 400kbits/s fast
• I2C-bus interface – ST7032i
• 80 x 8-bit display RAM (80 characters max.)
• 10,240-bit character generator ROM for a total of 256 character fonts(max)
• 64 x 8-bit character generator RAM(max)
• 16-common x 80-segment and 1-common x
• 80-segment ICON liquid crystal display driver
• 16 x 5 –bit ICON RAM(max)
• Wide range of instruction functions: Display clear, cursor home, display on/off, cursor on/off,
display character blink, cursor shift, display shift, double height font
• Automatic reset circuit that initializes the controller/driver after power on and external reset pin
• Internal oscillator(Frequency=540KHz) and external clock
• Built-in voltage booster and follower circuit (low power consumption )
• Com/Seg direction selectable
• Multi-selectable for CGRAM/CGROM size Instruction compatible to ST7066U and KS0066U
and HD44780
• Available in COG type
As you can see from the Features list above the ST7032 is suitable for low voltage supply (2.7V to 5.5V) and is perfectly suitable for any portable product which is driven by the battery and requires low power consumption. Exactly what we are looking for our 3V only ESP8266 module.
Please see ST7032 Datasheet for more details.
PINOUT :
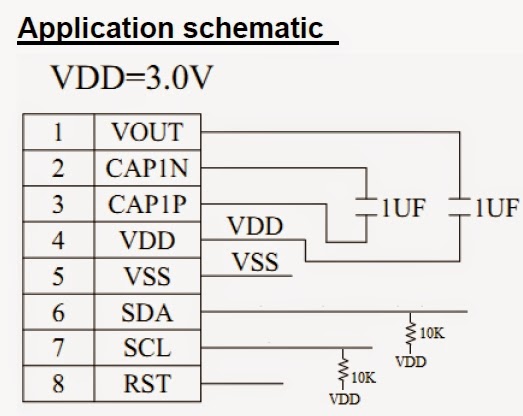 |
| Default schematic for Vdd = 3V usage |
What we will need:
- CBDB Board
- USB adapter (take a look on Part 1 for details how to connect them together)
- ST7032i LCD Module from above
 |
| CBDB DevBoard with ST7032i I2C LCD on Expansion port |
For programming and uploading the driver and the software we will continue to use the LuaUploader as before.
Driver implementation:
1. Init I2C interface:
       address = 0x3E
      id = 0
       init_i2c = function (self, sda, scl)
        i2c.setup(self.id, sda, scl, i2c.SLOW)
     end
2. Init LCD:
Necessary setup steps for proper initialising the LCD Display :
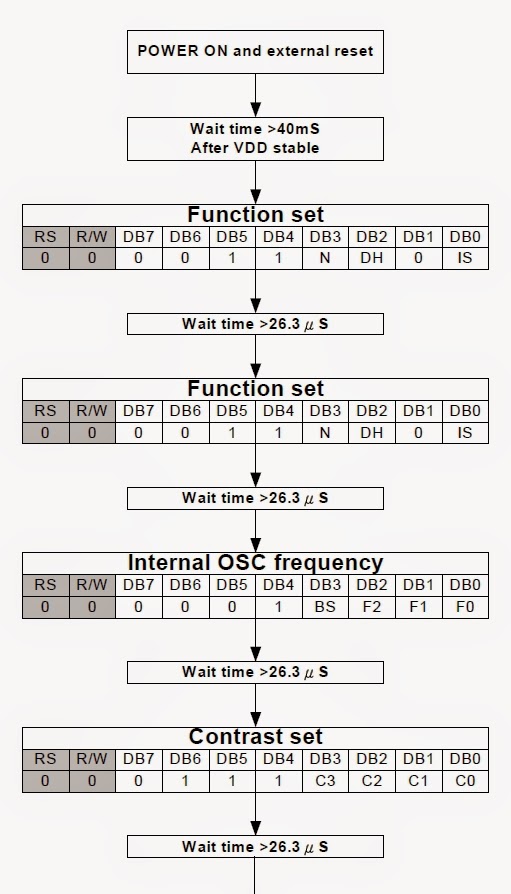
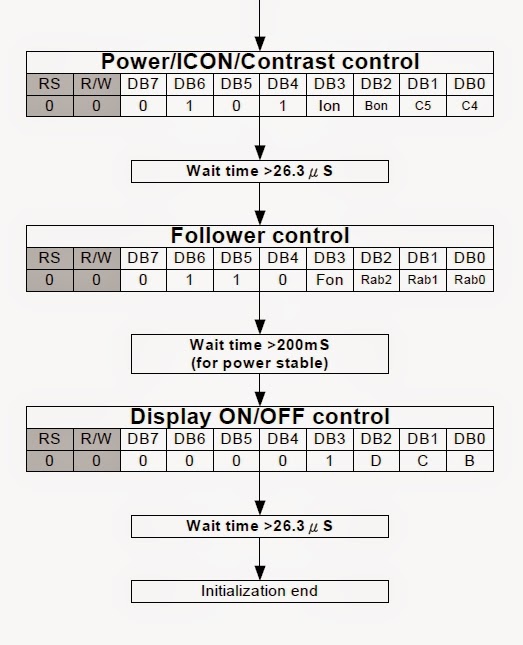 |
||
| Init LCD Steps |
init_LCD = function (self)
self:lcd_command(0x38); — function set basic
tmr.delay(300);
self:lcd_command(0x39); — function set extended
tmr.delay(300);
self:lcd_command(0x14); — internal OCS frequency adjustment
tmr.delay(300);
self:lcd_command(0x69); — contrast set low nible
tmr.delay(300);
self:lcd_command(0x54); — contrast set high nible / icon / power
tmr.delay(300);
self:lcd_command(0x6f); — follower control
tmr.delay(200000);
self:lcd_command(0x0c); — display on
tmr.delay(300);
self:lcd_command(0x01); — clear display
tmr.delay(350000);
self:lcd_command(0x06); — entry mode set
tmr.delay(300);
self:lcd_command(0x02); — home
tmr.delay(1000000);
end
      send_i2c = function(self, value, mode)
         i2c.start(self.id)
         i2c.address(self.id, self.address, i2c.TRANSMITTER)
         i2c.write(self.id, mode)
         i2c.write(self.id, value)
         i2c.stop(self.id)
     end
      lcd_command = function(self, value)
        self:send_i2c(value, 0x00)
     end
      lcd_write = function(self, value)
        self:send_i2c(value, 0x40)
     end
      lcd_clear = function(self)
        self:lcd_command(0x01)
        tmr.delay(350000)
     end
3.5 – LCD SetCursor
      lcd_setCursor = function(self, col, row)
        row_offsets = { 0x00, 0x40, 0x14, 0x54 }
        if ( row > 2 ) then
           row = 2-1
        end
        self:lcd_command(bit.bor(0x80,(col + row_offsets[row])))
        tmr.delay(300)
     end
      require('st7032i')                                --call for new created ST7032i Module Driver
      sda, scl = 2, 1                                    -- declare your I2C pinout
     st7032i:init_i2c(sda, scl)                   -- init I2C Bus
     st7032i:init_LCD()                            -- init LCD. See Datasheet for Reg Values calculation

    -- first test "Hello World!"
      st7032i:lcd_clear()                            -- Clear LCD Instruction
     st7032i:lcd_setCursor(0,1)               -- Set Cursor position(col, row)  LCD Instruction
      st7032i:lcd_write("Hello World!")   -- Print String "Hello World" at set location

       -- second test - 2 lines print
       st7032i:lcd_setCursor(2,1)               -- Set Cursor position(col, row)  LCD Instruction
       st7032i:lcd_write("First Line")        -- Print String "" at set location
        st7032i:lcd_setCursor(2,2)              -- Set Cursor position(col, row)  LCD Instruction
       st7032i:lcd_write("Second Line")     -- Print String "" at set location
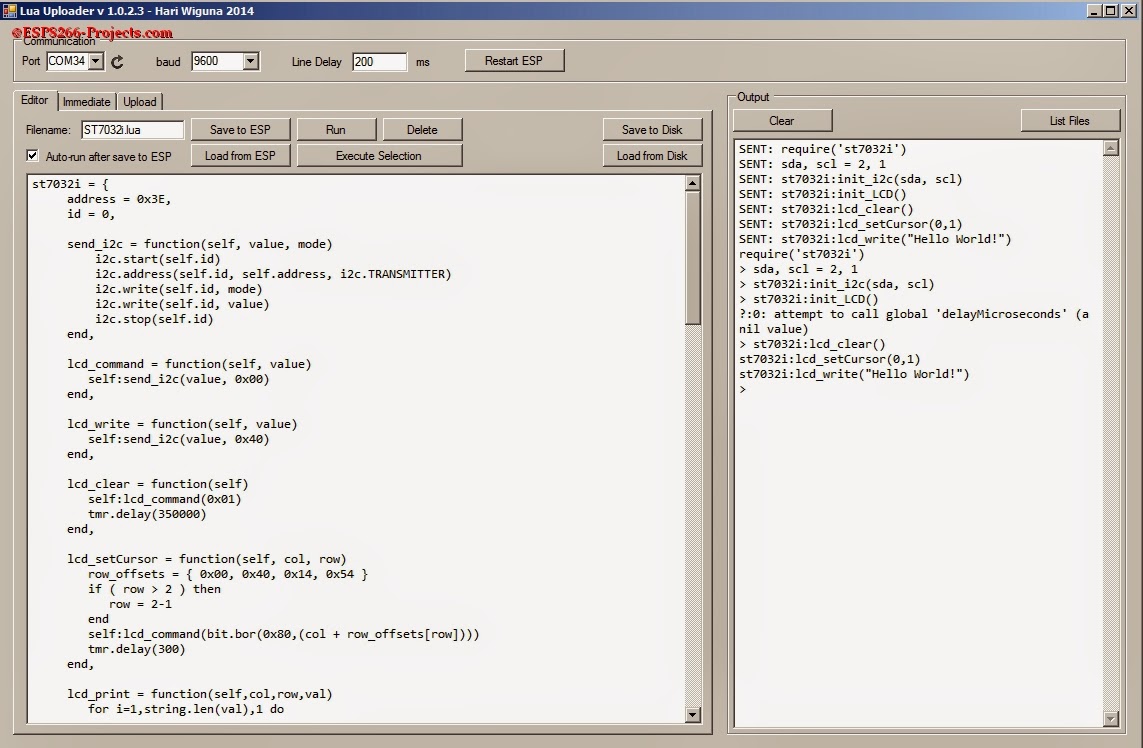 |
| Run “Hello World!” test |
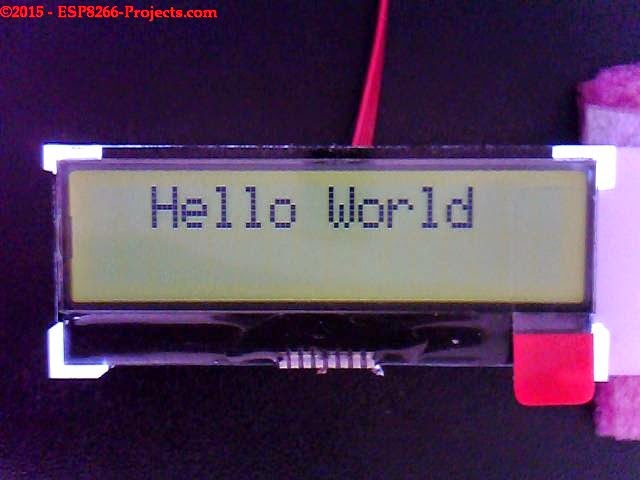 |
| Hello World! |
 |
| 2 lines test |
For printing also our live data values on LCD we will need an additional function to convert data in ascii character codes:
3.6 – LCD Print Value
      lcd_print = function(self,col,row,val)
        for i=1,string.len(val),1 do
          self:lcd_setCursor(col+i-1,row)
          self:lcd_write(string.sub(val,i,i))
          tmr.wdclr()
        end
     end
For testing, just save again the code on ESP as ‘st7032i.lua‘, restart ESP and run:
      require('st7032i')                                --call for new created ST7032i Module Driver
      sda, scl = 2, 1                                    -- declare your I2C pinout
     st7032i:init_i2c(sda, scl)                   -- init I2C Bus
     st7032i:init_LCD()                            -- init LCD. See Datasheet for Reg Values calculation

     st7032i:lcd_clear()                            -- Clear LCD Instruction
     st7032i:lcd_setCursor(0,1)               -- Set Cursor position(col, row)  LCD Instruction
      st7032i:lcd_write("Hello World!")    -- Print String "Hello World" at set location


      value=12.739                                     -- our value to print
     st7032i:lcd_print(0,2,value)              -- LCD Print(col, row, value) function call
 |
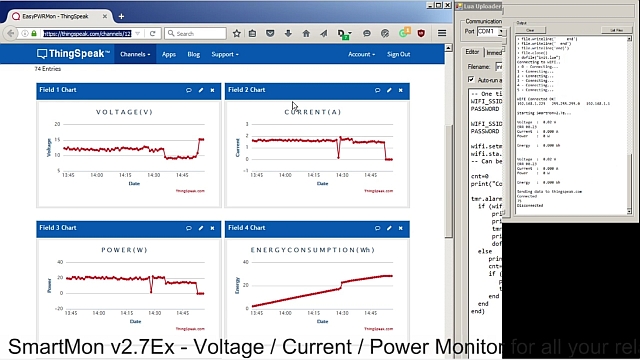
| Print data value on LCD
|
Test Video :