Using a 433Mhz radio link the ESP8266 CBDB Dev Board module equipped with a DHT22 temperature/humidity sensor is uploading data directly to the Konig 433 mhz wireless station with hygro-thermometer [KN-WS400N] :
As been working to a ESP DHT22 sensors array for a Environment data logging system I was thinking that it would be nice to have also a direct reading panel for the data. And because just received in my mailbox few days ago a KN-WS400 Weather station to be used for another project I said why do not to take a deeper look and see if we can use it also as a realtime data view panel for our DHT22 sensors.
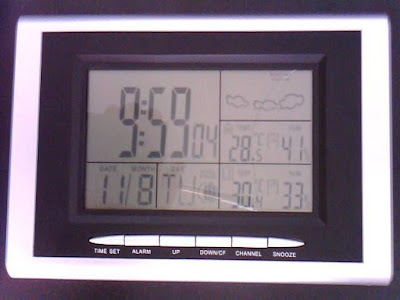
As you can see from the picture below, it has a big and nice looking display (not the best quality or contrast in town but, hey, it’s just a 40USD unit, nothing fancy):
 |
| KN-WS400 Weather station |
It has only temperature and humidity capabilities, but for our project is more than enough:).
What is interesting about KN-WS400 is the fact that it can receive temperature and humidity data also from another 3 external sensors (but delivered in the box with only one!).
You can setup and choose between 3 different channels, each one allocated for a separate remote sensor unit.
 |
| Remote sensor |
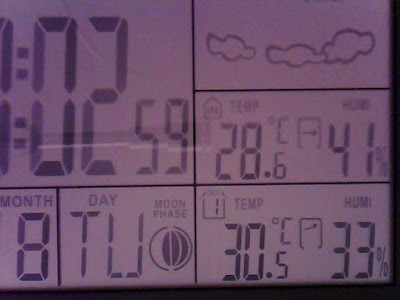 |
| Reading remote temperature data on Channel 1 |
Channel setup is done very simple, choose your desired free channel from your remote sensor unit and reset the corresponding channel on the Weather station by pressing more than 10 sec the channel button.
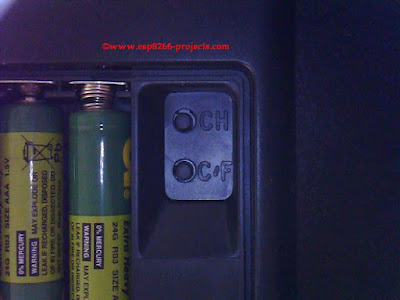 |
| External sensor CHannel setup and C/F scale option buttons |
So far so good. The idea is to try to use another 2 ESP DHT22 sensor units to send the temperature and humidity data directly to WS400 Weather station on the available channels. Or, why not, to replace them all 3 with the WIFI Web enabled ESP DHT22 smarter ones 🙂
To do this, first of all we need to take a look at the transmission frequency to know what kind of receiver/transmitter to use with our ESP DHT22 Modules.
As is written on the back of the unit, the KN-WS400 Weather station use for remote sensors communication the standard 433Mhz frequency, same as probably most of the zillions different types of cheap weather stations available around.
So now, as we know the frequency, next we need to see if we can have any luck in decoding the communication protocol.
What do we need:
- Konig 433 mhz wireless station with hygro-thermometer [KN-WS400N]
- ESP CBDB DevBoard (or any other ESP Board you might like)
- USB adapter
- DHT22 Sensor
- 433Mhz transmitter and receiver modules
- Oscilloscope – Rigol DS1054Z
I will not insist to much on the wiring setup as it is a very simple one, just connect your simple 433mhz Receiver module to your Power supply Vcc , GND and the Data pin to your used Oscilloscope channel probe.
As soon as it is connected and you start changing the channel on the KN-WS400 sensor module by pressing the CH button from the back of the unit, you will see a data burst on your Oscilloscope. See also Youtube video from above.
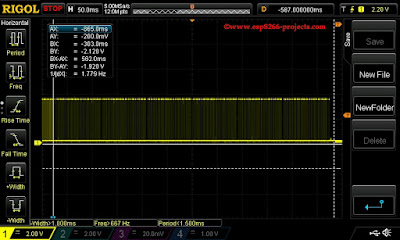 |
| Data burst received on 433Mhz from KN-WS400 remote sensor |
As you can see from the captured data above, it looks like the unit is transmitting the data in 6 separate data bursts. Actually, when zoomed in we can see that is sending the same data 6 times.
At a deeper look at the received data stream we can see that:
- Each transmission consists of 6 repetitions of the same data.
- They are separated by a long sync signal (“preamble”) that’s about 4.5ms (3.8ms low + 0.7ms high)
- We can suppose the bit patterns (they might be inverted sometime 1<->0 but is not the case of this sensor) as:
– Logic 1 (or 0) is about 2.6ms -> 1.9ms low + 0.7ms high
– Logic 0 (or 1) is about 1.7ms -> 1.0ms low + 0.7ms high
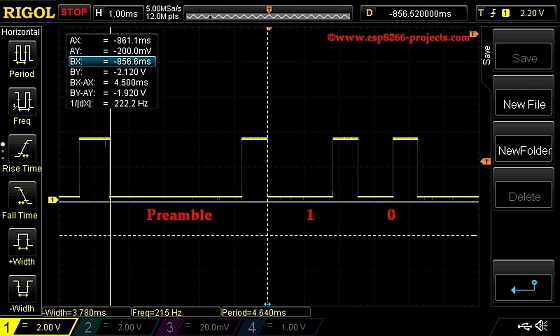 |
| “Preamble” measurement |
 |
| Logic “1” Measurement |
 |
| Logic “0” measurement |
Based on the assumptions from above, let’s try to “transcribe” the signal from the above:
PRE10101011100100010000010111110011010100000PRExxxxPRExxx4PRE
Before even thinking to try to decode the data we need to be able to identify where reside each data value in the stream. For this taskthat can become quite complicated or impossible some time, you can start using a very simple technique: just change only one variable at a time, in very small increments if possible and look after changes.
The easiest one to do, is the Channel setup, as we have on the back of the sensor unit a switch for it.
Press the channel button and change Channel to 1,2 and 3.
Capture and take a look at the received data :
PRE10101011100100010000010111110011010100000PRExxxxPRExxx4PRE
PRE10101011101000010000010111110011010100000PRExxxxPRExxx4PRE
PRE10101011100000010000010111110011010100000PRExxxxPRExxx4PRE
Ahaaa..have you seen it? 🙂
Let’s arrange the data in a more readable format:
1010 1011 1001 0001 0000 0101 1111 0011 0101 0000
1010 1011 1010 0001 0000 0101 1111 0011 0101 0000
1010 1011 1000 0001 0000 0101 1111 0011 0101 0000
Looking better? 🙂
Now you can clearly see that the channel data (CH) is encoded on 2 bits in the 3rd column. Not bad at all. You know why? because despite the fact that you cannot find 2 Weather stations with the same exact data format they are quite similar and any existing information can help you a lot in the reduction of the complexity of the decoding process.
Let’s make another assumption based on the info that we already have from other existing models, that the first 2 bits from column 3 to be the battery status ones. Usually they are coded in this way.
Powering the sensor unit from an external lab PSU and reducing gradually the voltage until under normal working one the data obtained looks:
1010 1011 1001 0001 0000 0101 1111 0011 0101 0000
1010 1011 0101 0001 0000 0101 1111 0011 0101 0000
1010 1011 0001 0001 0000 0101 1111 0011 0101 0000
Where :
“10” -> PWR GOOD
“01” -> AVG
“00” -> Replace battery
Nice. So, until now, we have identified the Battery status and Channel ID. Let’s go further.
For temperature and humidity a common found coding technique is as follows:
- Humidity is stored as low/high order nibbles. So you need to take the first 4 bits and tack them on the end of the next 4 bits. 11010101 becomes 01011101.
- Temperature is transmitted as 12 bits in 3x nibbles ranging from low to high nibbles. A fixed offset of 900 is applied to the temperature value so 0 degrees F = 900 and each degree F change is 10 decimal. Then the obtained value is divided by 10. And converted to degC. Confusing and painful stuff to find in a data stream.
Sounds complicated? Why are temperature and humidity data coded like that?
My personal opinion is that some specifications were created for the first designed one and now as these cheap weather stations has become such a mass product everybody is copying more or less the same design 🙂
If somebody really knows the true reason for such a coding, I will more than happy to know. Might be some good reasons behind that I’m missing.
Let’s see what’s happening in our case. And before anything else, let’s use the same technique, keeping all the data the same and change slowly Temperature only part:
Battery=2
Channel=2
Humidity=29%
10101011 1001 0001 0011 1010 1111 0001 1101 0000
10101011 1001 0001 0011 1001 1111 0001 1101 0000
10101011 1001 0001 0011 1000 1111 0001 1101 0000
10101011 1001 0001 0011 0111 1111 0001 1101 0000
10101011 1001 0001 0011 0101 1111 0001 1101 0000
10101011 1001 0001 0011 0100 1111 0001 1101 0000
Can you see the temperature data changing?
And you know what?
IT IS IN deg C already!!
If you don’t believe me just convert the values in decimal and divide them by 10!
For this type of weather station is no more fancy Fahrenheit transformation voodoo thing. You can see it in clear above.
Then you know what? Let’s try directly our luck also with Humidity values. We have a steady 29 above, let’s find it:
10101011 1001 0001 0011 1010 1111 0001 1101 0000
10101011 1001 0001 0011 1001 1111 0001 1101 0000
10101011 1001 0001 0011 1000 1111 0001 1101 0000
10101011 1001 0001 0011 0111 1111 0001 1101 0000
10101011 1001 0001 0011 0101 1111 0001 1101 0000
10101011 1001 0001 0011 0100 1111 0001 1101 0000
WOW! Now that was a nice surprise! All in clear, no more fancy calculations 🙂
So, what we have so far:
Unique ID VBAT CH Temperature ???? Humidity 0
10101011 10 01 0001 0011 1010 1111 0001 1101 0000
Puzzle is almost solved.
Only few things remained “undecoded” but believe me after capturing hundreds and hundreds of data streams it looks like de ID remains stable, same with the mysterious “1111” between Temperature and Humidity and the “0” from the end.
As it looks like there is no fancy Checksum algorithm involved or any special data stream identifier I think we can move further and design your own ESP DHT22 Module transmission program for direct data upload. And as you can see in the above Youtube video it was a success.
As soon as I cleaned it a little bit, the Part 2 will follow, with the full code description.
PS: I really hope that after reading this article the guys from Konig or who are doing the coding for this product will let it as it is because it has becoming the most desired cheap Wireless Weather Station around, believe me, they are selling like hotcakes :). Thank you Konig for such a nice surprise for all of us!
And to be clear: I am NOT afiliated in any way with Konig and the unit was not received from Konig. But if they want to thank me for opening a new market for their products I will not say no. lol.

1 Comment
Madis · May 23, 2018 at 3:56 pm
WOW! Great job!
I have the same unit in home. Years it was without “satellites”.
Today i got one… Had idea to “copy” this unit, but fail – it’s cheap COB piece…
Enyway, did you made it?